
DIY Weight Tree for Your Home Gym
Here at DIY Active, we are all about getting fit at home but many people are worried that costs too much. But never fear! There are several ways you can create your own DIY equipment for almost nothing! Check out this economical DIY weight tree and how it can complement your squat rack!
Build your own at-home gym
I have been squatting for the last few years in the gym and recently decided to move my whole setup to my home. I picked up a squat rack and an Olympic bar to facilitate as close to a gym experience as possible. These things weren’t cheap!
When it came time to purchase a weight tree for my 45’s, 35’s, 25’s… etc. I couldn’t stomach spending another $100 on storage.
Plus, I slightly overspent on the squat rack and so needed a more DIY approach.
So I did a bit of research on how to create my DIY weight tree and found out that the materials I would need were much less expensive than I imagined. What I used is listed below.
Also, click this link to get thousands of top woodworking plans and projects.
[Note: Use proper safety gear during construction. This product has not been load-bearing tested so use at your own will.]
- 1 – 2x4x104
- 1 – 2x4x48
- 1 – 1 ¼ x 36 inch Oak Dowel
- 1 – 1 ¼ x 8-inch dowel
- 30 wood screws
- Wood glue
I picked up this material for around 12 dollars. I had the following already in my garage – you probably will as well.
- Level
- Bar clamps
- 1 ¼ auger bit (this is to drill out the holes the dowel goes through)
- Drill
- Tape Measure
- Saw (I used a chop saw…but even a hand saw will do)
Most of these materials should be around your house or will be fairly easy to borrow.
Cut List:
Cut the 2 x 4 x 104 into:
- 2 – 37 inch pieces
- 1 – 24 ½ inch piece
- 1 – 3 ½ inch piece
- 1 – 6 inch piece
Cut the 2 x 4 x 48 into:
- 1 – 24 ½ inch piece
- 1 – 6 inch piece
- 1 – 3 ½ inch piece
Cut the 1 ¼ x 36-inch dowel into:
- 1 – 18 ½ inch piece
- 1 – 17 ½ inch piece
Cut the 1 ¼ x 78-inch dowel into:
- 1 – 8 inch piece
*** If you’re picking your lumber up at the hardware store ask the clerk to make these cuts for you! They will gladly do it for no extra charge!***
Now that we’ve got all the technical cuts and the needed materials out of the way – this thing literally took me 45 minutes to build after picking up the material. Putting it together wasn’t really difficult. I’ve been using it for the last month or so and it’s held up like a champ.
REVIEW: Best Product to Kickstart Your Wellness Journey in 2022?
Step 1: (Assuming that you’ve got all your materials cut to length).
- Use the 1 ¼ Auger bit in the drill to drill a hole into both of the 37’ lengths of 2×4.
- The first hole at 7 ½ inches from the top.
The second hole at 22 ½ inches from the top. - These holes should line up (you’ll be putting the dowel through there).
Step 2:
- Take the 3 ½ inch square cut-off and use the same auger drill bit to drill a hole ¾ of the way through the wood. Do NOT go all the way through!
- Insert the 8’ dowel into the hole you just made. Now secure it with one of the wood screws from the bottom (into the dowel).
Step 3: Making the Base Supports
- Mark the center of both of the 24 ½’ pieces of 2×4.
- Attach the 6’ pieces on the outside of these pieces of wood.
- ***Drill 2 pilot holes through the 24 ½ inch 2×4 into the 6 inch using the clamps to hold the 6-inch pieces in place*** Failure to do this step may result in the wood splitting. This is the base of the weight tree – so you REALLY don’t want that. Make sure you drill those pilot holes.
- Once the pilot holes are drilled unclamp the 6-inch piece. Put wood glue into each of the pilot holes and then use the wood screws to finish attaching the 6-inch piece to the 24 ½ inch pieces.
This finishes the base. Put those aside for a few minutes and we’ll build the load-bearing part of the weight tree.
Step 5:
- Take the two 37’ pieces (the ones with identical holes drilled in them). These make up the meat and potatoes of the weight tree.
- Place the 3 ½ inch square piece of wood between the 2 37’ pieces. This block should be placed 2 ½ inches from the bottom.
- ***Important!*** Use the square before clamping!!! If you don’t your weight tree may lean or not be as strong. Square it up!
- Clamp the pieces together and drill 2 pilot holes per side.
- Unclamp and use wood glue in each of the pilot holes.
- Reclamp and secure with wood screws.
Step 6:
It’s time to tackle the last part of the tower.
- For the last part of the tower, we are going to put the other 3 ½ blocks – the one we added the 8’’ dowel to – to the top of the tower.
- This block should be flush with the top of the tower.
- Use the same clamping/pilot holes/wood glue process used in step 5 to secure the block in place.
Step 7: Adding the Dowel
- Tap the 17 ½’’ dowel through the top holes.
- Tap the 18 ½’’ dowel through the bottom holes.
- It should be a tight fit – but not too tight. If you have a hard time getting the dowels through, use a hammer to tap them. If they won’t go through then use the auger drill again to widen the holes. But just a bit at a time. You don’t want to make them too wide and risk the dowel sliding around through the holes. That won’t hold the weight!
Step 8:
Now we’re going to secure the tower to the base. Grab the 2 base pieces we made in step 3 and…
- Center the tower between the 2 base supports.
- Clamp and Drill 2 pilot holes per side through both pieces of wood (Again we don’t want the wood splitting on the base).
- Use the same method used in step 5 to secure to the bottom. (Unclamp, glue, reclamp, screw).
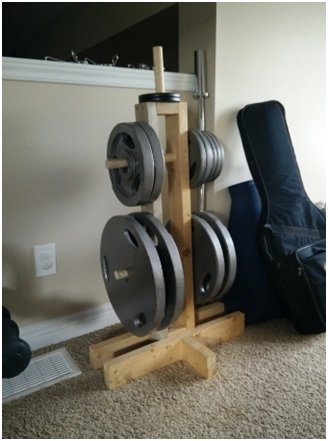
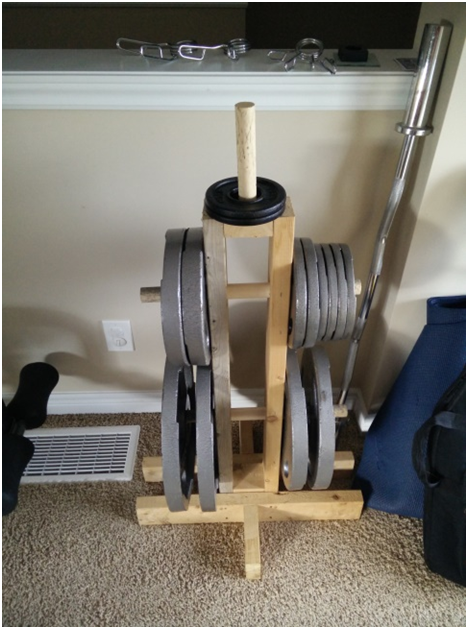
And we’re done. You should have a weight tree that will hold quite enough weight to work your body for a few years.
Mine is currently holding two 45’s, two 35’s, two 25’s, two 10’s, four 5’s with a bit of room to spare.
Wrap-Up
This whole build cost me less than $20 dollars and a bit of elbow grease.
Much less expensive than the $100 plus weight tree I was looking at.

- Build It: DIY Weight Tree For Around $20 - February 10, 2021


